-
Centralized Configuation (feat. spring.io)개발 일지/Cloud 2022. 6. 28. 18:02반응형
이번에는 스프링 클라우드 구성 서버 튜토리얼 페이지를 번역해보겠습니다!
https://spring.io/guides/gs/centralized-configuration/
Centralized Configuration
this guide is designed to get you productive as quickly as possible and using the latest Spring project releases and techniques as recommended by the Spring team
spring.io
조금 보기 편하게 의역도 포함됩니다.
목표:
이 튜토리얼에서는 Spring Config Server 를 준비하고, 클라이언트가 기동될 때 config 서버의 설정 값을 사용한 다음에 재시작하지 않고 설정 값을 리프레시하는 클라이언트를 빌드합니다.
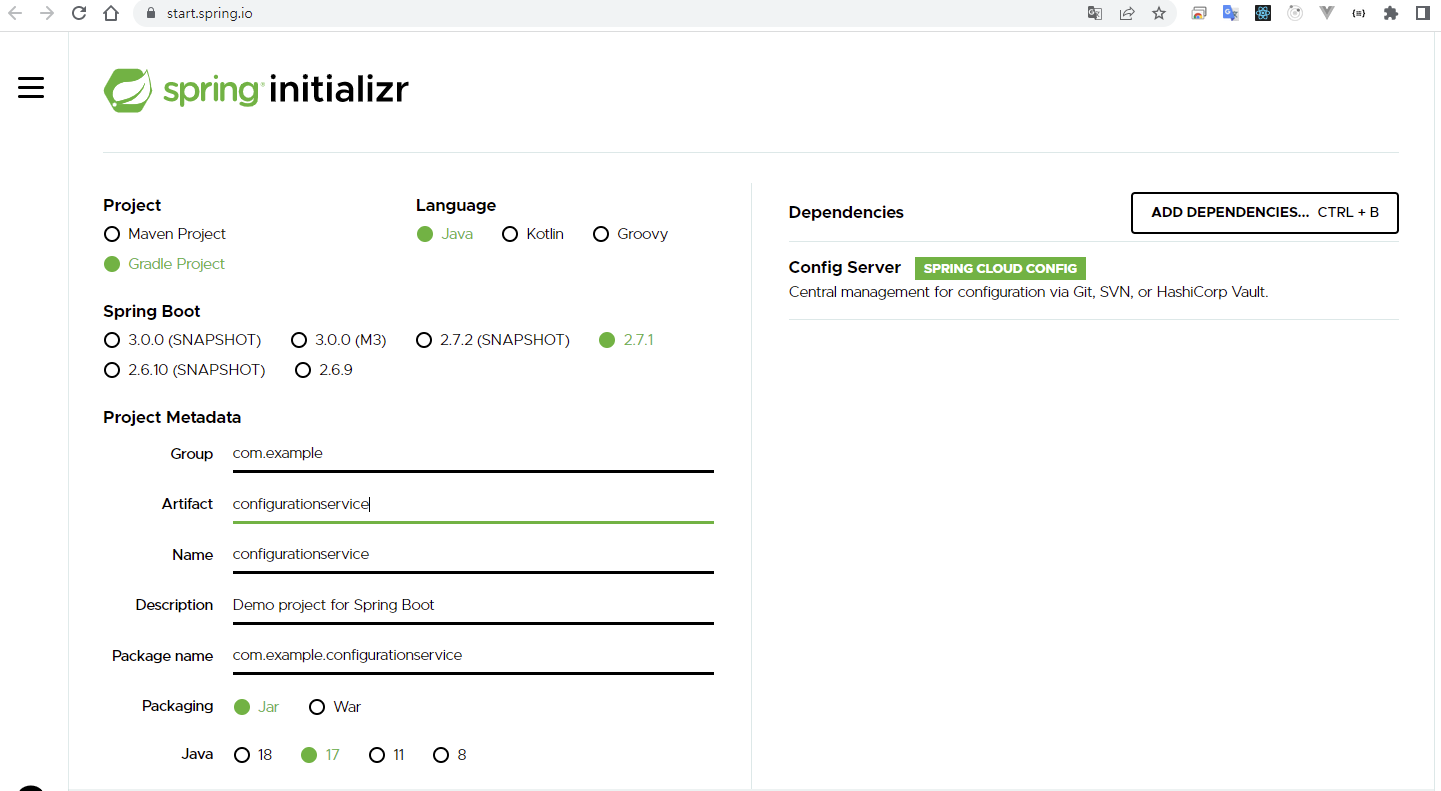
프로젝트 생성:
늘 그렇듯이 spring.io에서 Initializr로 프로젝트를 생성해 줍니다.
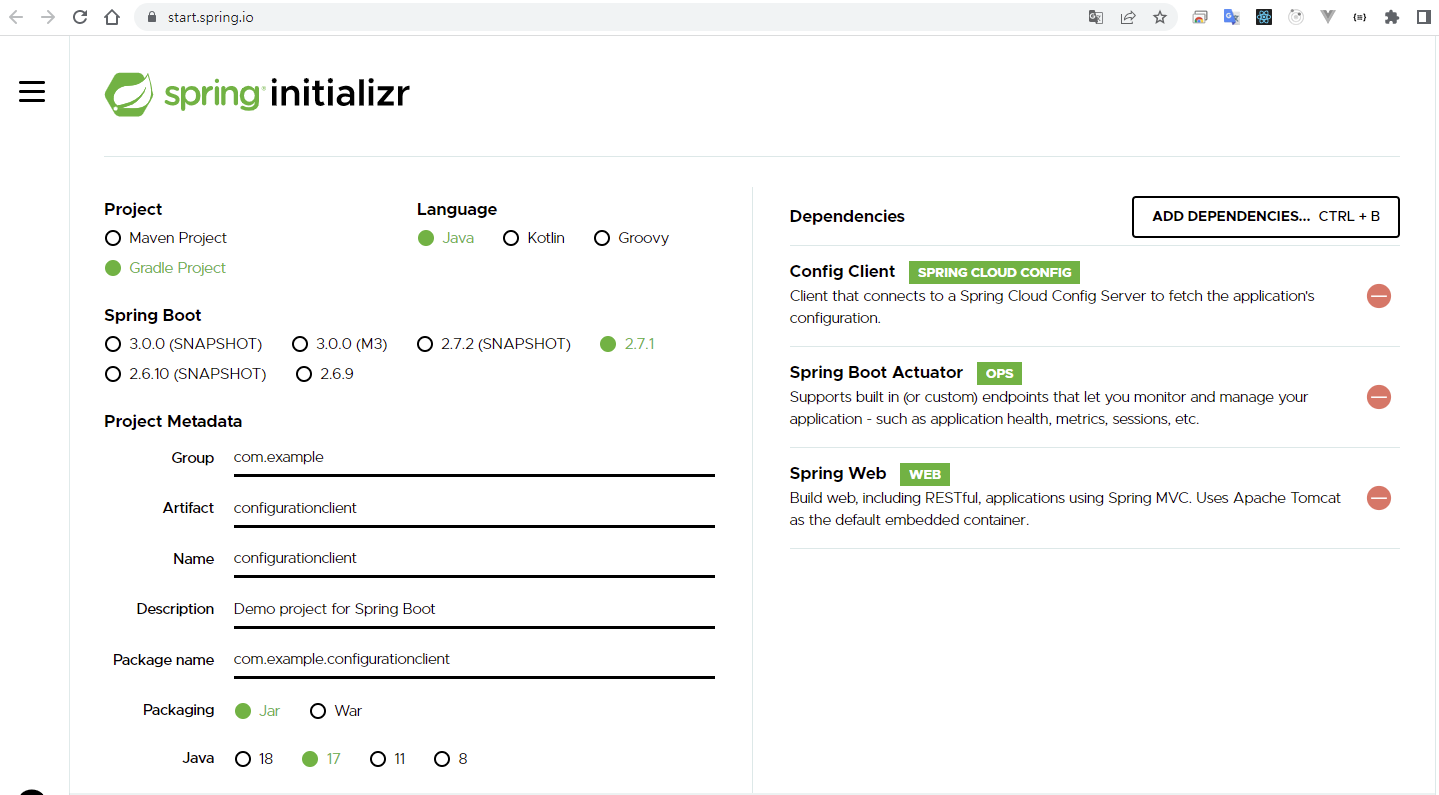
의존성:
- Config Server (서비스 애플리케이션)
- Config Client, Spring Boot Actuator, Spring Web (클라이언트 애플리케이션)
1. Config Server 구성
먼저 1)스프링 애플리케이션과 2)config. 파일의 version-controlled 리포 사이에 중개 역할을 하는 Config 서비스가 필요합니다.
스프링 클라우드의 @EnableConfigSerber 애노테이션을 사용하여 다른 애플리케이션 간에 통신할 수 있는 구성 서버를 설정할 수 있습니다.
메인 메서드가 있는 애플리케이션 클래스에 해당 애노테이션을 추가합니다.
/*
 * Copyright 2012-2020 the original author or authors.
 *
 * Licensed under the Apache License, Version 2.0 (the "License");
 * you may not use this file except in compliance with the License.
 * You may obtain a copy of the License at
 *
 *      https://www.apache.org/licenses/LICENSE-2.0
 *
 * Unless required by applicable law or agreed to in writing, software
 * distributed under the License is distributed on an "AS IS" BASIS,
 * WITHOUT WARRANTIES OR CONDITIONS OF ANY KIND, either express or implied.
 * See the License for the specific language governing permissions and
 * limitations under the License.
 */

package com.example.configurationservice;

import org.springframework.boot.SpringApplication;
import org.springframework.boot.autoconfigure.SpringBootApplication;
import org.springframework.cloud.config.server.EnableConfigServer;

@EnableConfigServer
@SpringBootApplication
public class ConfigurationServiceApplication {

  public static void main(String[] args) {
    SpringApplication.run(ConfigurationServiceApplication.class, args);
  }
}
Config 서버는 관리해야하는 저장소(repo)를 알아야 합니다.
몇가지 옵션이 있지만 이 튜토리얼에서는 깃(Git) 기반 파일 시스템 리포를 다룹니다.
파일 시스템에서 새로운 폴더를 만들고 "git init" 명령어를 실행합니다. 그리고 "a-bootiful-client.properties" 파일을 추가합니다. 그 다음에는 해당 파일을 커밋("git commit")합니다.
나중에, "spring.application.name=a-bootiful-client" 인 스프링 부트 애플리케이션을 Config 서버에 연결합니다.
이렇게 새로 생성한 "a-bootiful-client.properties" 파일에 속성=값(message=Hello world)를 입력한 다음 커밋해 줍니다.
자 이제... 서비스 애플리케이션의 "application.properties" 파일에서 "spring.cloud.config.server.git.uri" 속성에 위 깃 리포의 위치(파일 시스템 내 경로)를 작성합니다.
# application.properties

server.port=8888

spring.cloud.config.server.git.uri=${HOME}/Desktop/config
튜토리얼에서는 파일 시스템의 깃 리포를 사용하지만 원격지의 깃 서버(깃헙 등)로 구성할 수 있습니다.
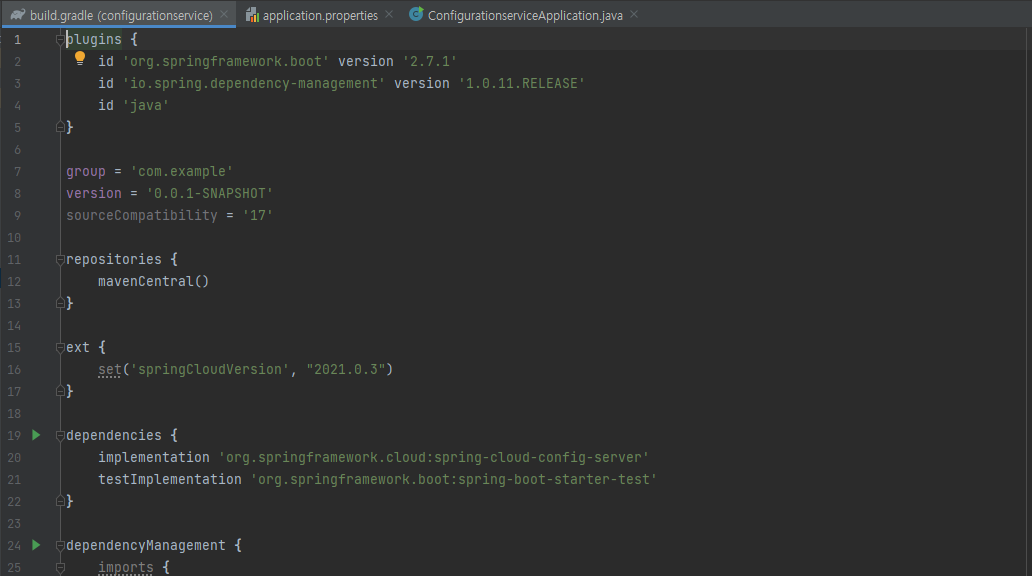
build.gradle - dependency 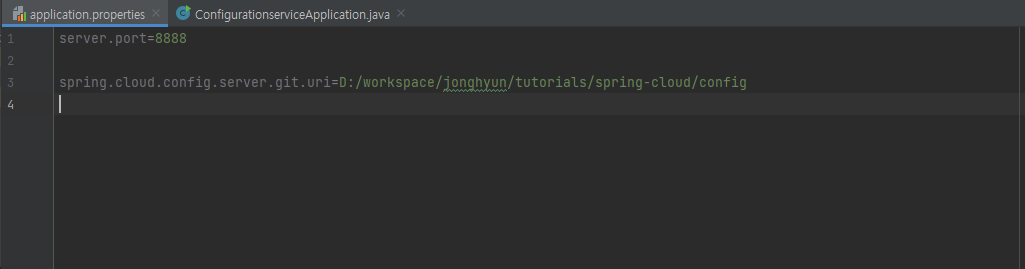
application.properties 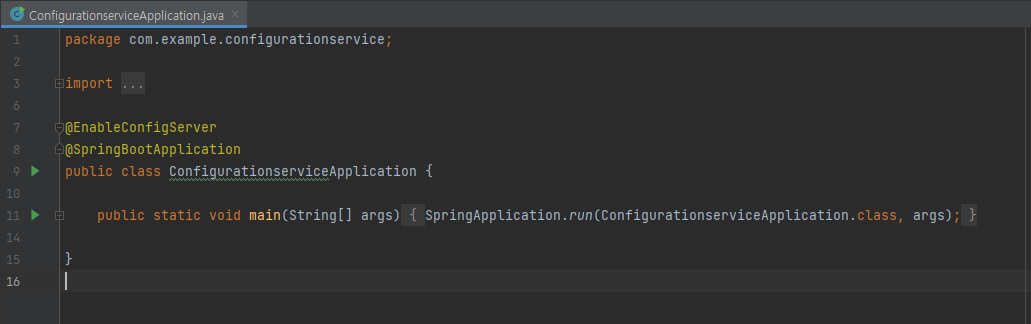
serverApplication.java 
a-bootiful-client.properties
2. Config Client
위에서 Config Server를 설정했습니다.
이제 Config Server에서 적합한 설정을 로드할 수 있는 Spring Boot 애플리케이션을 만들어 보겠습니다.
클라이언트는 JVM 재시작 없이 새로고침 함으로서 Config Server에서 변경된 부분을 온디멘드로 반영할 수 있습니다.
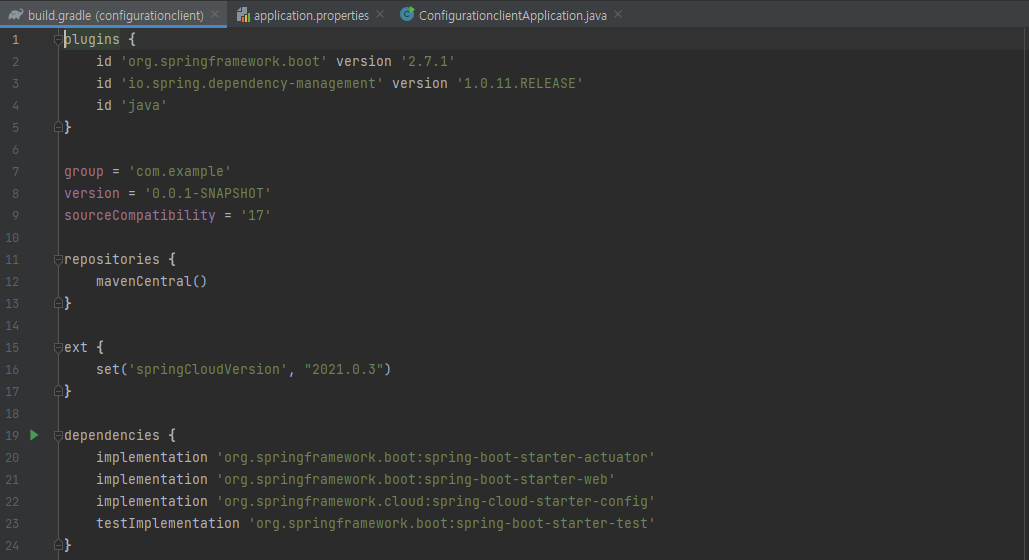
"org.springframework.cloud:spring-cloud-starter-config" 의존성을 추가해서 Config Server에 연결할 수 있습니다.
클라이언트 설정을 위한 속성은 일반적인 방법으로 구성할 수 있습니다.
특정 클라이언트의 이름(a-bbotiful-client) "spring.application.name"과 Config Server의 위치 "spring.config.import"를 application.properties 파일에 작성합니다.
spring.application.name=a-bootiful-client
spring.config.import=optional:configserver:http://localhost:8888/
management.endpoints.web.exposure.include=*
/refresh 엔드포인트를 활성화하여 동적으로 configuration이 변경되게 할 수 있습니다.
위 속성 중 "management.endpoints.web.exposure.include" 으로 구현합니다.
클라이언트는 기존 메커니즘(@ConfiguationProperties 또는 @Value("${...}") 등)을 사용해서 Config Server의 모든 값에 접근할 수 있습니다.
이제 "message" 속성의 값을 찾아 리턴하는 Spring MVC REST 컨트롤러를 작성합니다.
package com.example.configurationclient;

import org.springframework.beans.factory.annotation.Value;
import org.springframework.boot.SpringApplication;
import org.springframework.boot.autoconfigure.SpringBootApplication;
import org.springframework.cloud.context.config.annotation.RefreshScope;
import org.springframework.web.bind.annotation.RequestMapping;
import org.springframework.web.bind.annotation.RestController;

@SpringBootApplication
public class ConfigurationClientApplication {

	public static void main(String[] args) {
		SpringApplication.run(ConfigurationClientApplication.class, args);
	}
}

@RefreshScope
@RestController
class MessageRestController {

	@Value("${message:Hello default}")
	private String message;

	@RequestMapping("/message")
	String getMessage() {
		return this.message;
	}
}
기본적으로 설정(configuation) 값은 클라이언트를 구동할 때 읽고 다시 읽지는 않습니다.
하지만 해당 설정에 대해 새로고침(refresh)를 강제하려면 "MessageRestController"에 스프링 클라우드 설정인 @RefreshScope를 추가하면 됩니다.
build.gradle - dependency 
application.properties 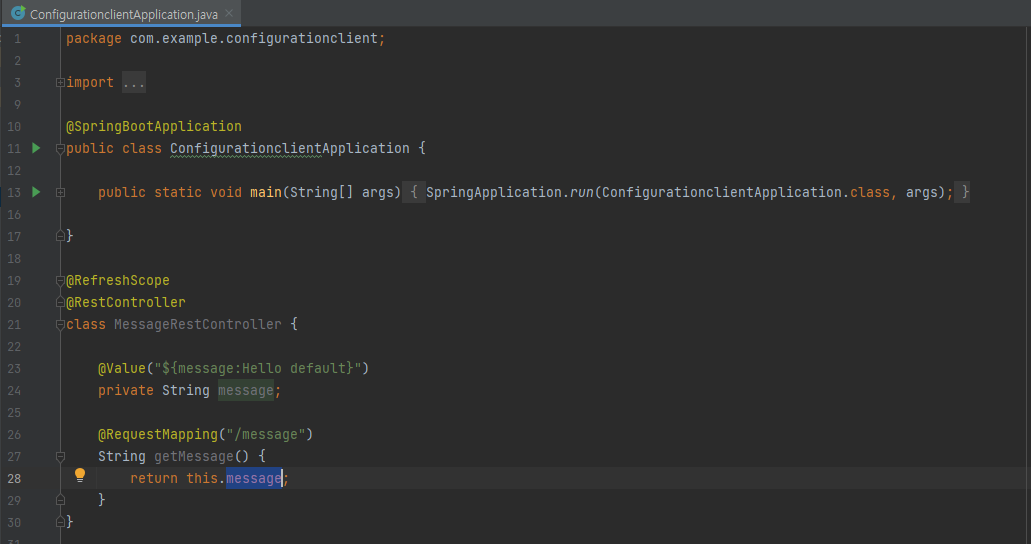
clientApplication.java
3. 테스트
Config 서비스(server)를 실행하고 나서 클라이언트를 기동해서 end-to-end 테스트를 진행합니다.
그리고 브라우저를 통해 클라이언트에 접근하면 (http://localhost:8080/message), 응답에서 "Hello world" 를 확인할 수 있습니다.

http://localhost:8080/message 깃 리포의 "a-bootiful-client.properties" 파일에서 message 키의 값을 다른 것으로 바꿔봅니다. (save & commit)
변경된 값은 "http://localhost:8888/a-bootiful-client/default" 에서 확인할 수 있습니다.
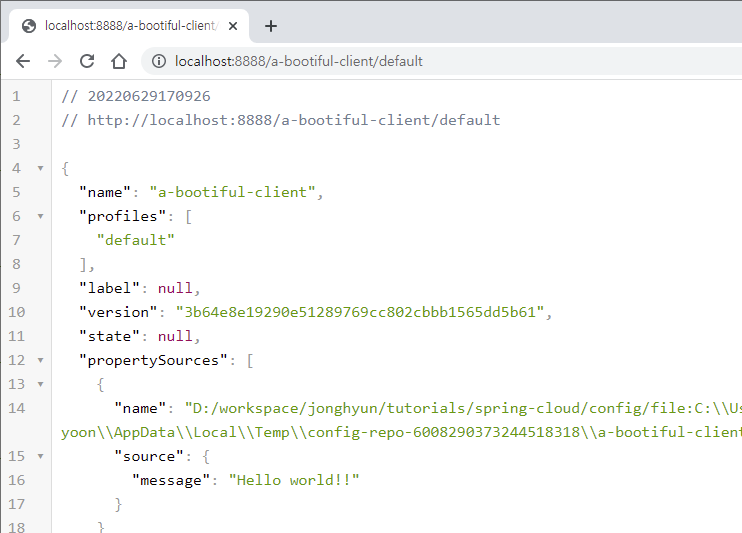
http://localhost:8888/a-bootiful-client/default 클라이언트가 새로운 값을 가져가게 하기 위해 refresh하게 하려면 스프링 부트 액츄에이터 refresh 엔드포인트를 호출해야 합니다.
스프링 부트의 Actuator는 애플리케이션에 대한 운영 엔드포인트(상태 확인 및 환경 정보)를 노출합니다.
이를 사용하려면 "org.springframework.boot:spring-boot-starter-actuator"를 클라이언트 애플리케이션의 classpath 에 추가해야 합니다.
클라이언트 refresh 엔드포인트("http://localhost:8080/actuator/refresh")에 empty HTTP Post 요청을 보내서 Actuator refresh를 호출할 수 있습니다.
그런 다음 "http://localhost:8080/message"에서 제대로 반영이 됐는지 확인할 수 있습니다.
$ curl localhost:8080/actuator/refresh -d {} -H "Content-Type: application/json"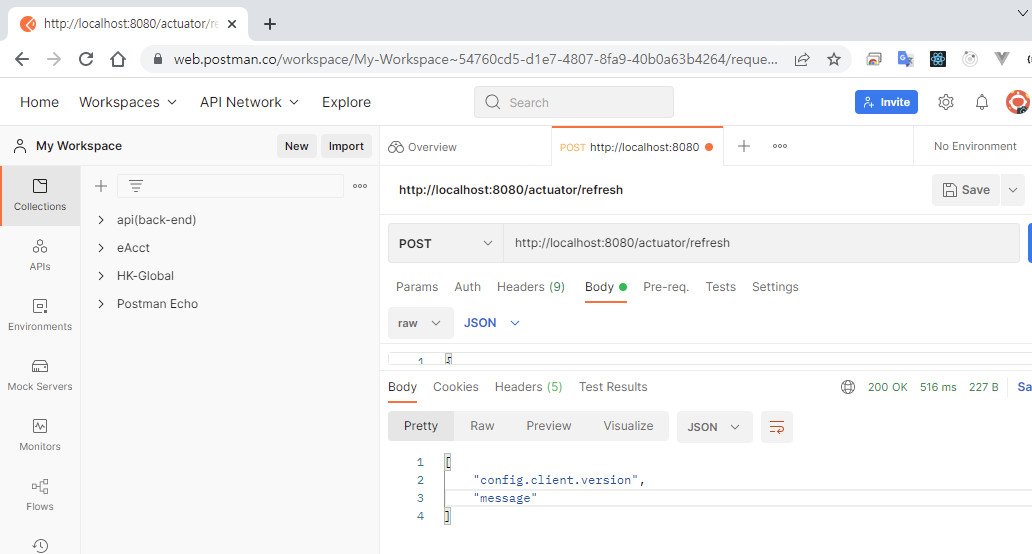
postman 사용 반응형'개발 일지 > Cloud' 카테고리의 다른 글
Spring Cloud Sleuth - Overview (0) 2022.07.08 Spring Cloud Circuit Breaker (0) 2022.06.30 Spring Cloud Gateway (feat. spring.io) (0) 2022.06.27 서비스 등록 및 디스커버리 (feat. spring.io) (0) 2022.05.20 Spring Cloud 페이지 한글 정리 (0) 2022.05.19